The combination of Turntablism and Controllerism, originates the Controltablism and the musical figure of Controltablist, which expands the possibilities of DJing with the Digital Vinyl System associated with sequencers. In the video being shown Serato DJ on Mixars Duo, combined with the sequencer of Ableton Live and Push 2 controller. After inventing the innovative technique of the Cue Point Sequencing, John Type presents for the first time the Ableton Cue Point Mapping, which allows you to record on Ableton, a sequence of cue points directly from your mixer, player or controller, equipped with cue point buttons.
Description of the video performance
To better understand the demo of Controltablism with Ableton Live, the performance in the video is simplified as much as possible, as the choice to use the famous song “I Want You Back” by Jackson 5.
The video focuses on 4 main steps:
1. Ableton Cue Point Mapping: a way to record MIDI messages of cue points, from Serato to Ableton directly from your mixer, player or controller
2. Cue Point Sequencing: a sequence of cue points recorded in a sequencer, in this case recorded with Ableton Cue Point Mapping
3. Controllerism: launch and recording of clips in Ableton Session View and synth chords with the Note Mode of Push
4. Turntablism: scratching on guitar Cue Point Sequencing on Deck 2 and a sax solo on Deck 1
 The cue points at the beginning of the song “I Want You Back” used in the Cue Point Sequencing of the video
Syncing Serato DJ with Ableton Live
The original speed of “I Want You Back” is 98 bpm, with the turntable pitch is sped up to 104 BPM of Ableton Live session. However, you can synchronize the Bpm of Ableton and Serato with the Ableton Link technology. The original key of the track is preserved with the Key Lock function Serato, or Pitch ‘n Time DJ.
Ableton Cue Point Mapping Tutorial
First at all, it is important to understand the same cue point is divided into 2 parts:
• Hardware Cue Point > physical button on the mixer
• Software Cue Point > virtual button in the software From hardware Cue Point to Software Cue Point, 2 signals are sent in parallel: both the factory mapping and Ableton Cue Point Mapping. We will use IAC Driver to emulate a virtual machine and make believe to Serato, our MIDI signal comes from an external device.
Requirements
• Mixer, player or controller compatible with MIDI, equipped with cue point buttons
• Serato DJ Software
• Ableton Live Software
Push 2 and other controllers is not essential in the mapping operation, but during the live performance.
Settings
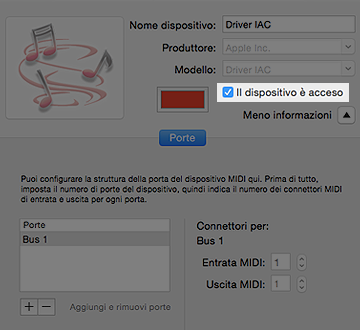
Application > Utility > Audio MIDI Setup
Menu > Window > MIDI Studio > Driver IAC
Checkbox: Device is online
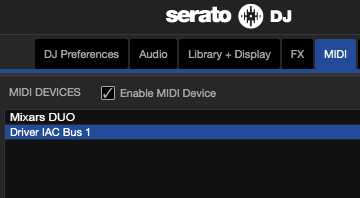
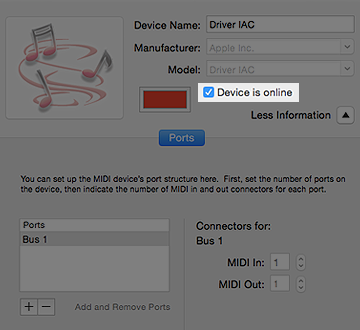 Enable IAC Driver in Serato DJ:
Setup > MIDI > MIDI Devices
Select: Driver IAC Bus 1
Checkbox: Enable MIDI Device
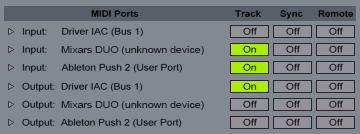
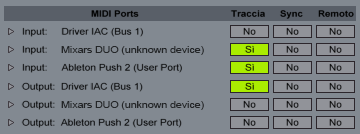
Preferences > MIDI
Input: Ableton Push 2 > Track > Yes
Input: Mixars DUO > Track > Yes
Output: Drive IAC (Bus 1) >Track > Yes
Settings in the Session View of Ableton Live:
1. Create MIDI track and name it “SERATO”
2. MIDI From: select Mixars DUO
3. All Channels
3. Monitor: Off
4. MIDI To: Driver IAC (Bus 1)
5. Ch. 8 (select a free MIDI channel)
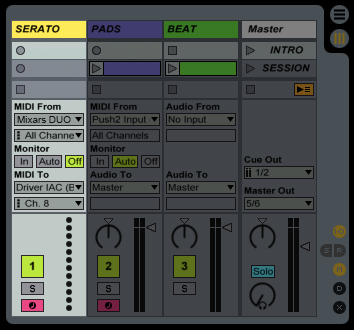
Depending on requirements, create one or more MIDI tracks with the same settings, to control more Serato decks independently.
Mapping operation
Before starting with the mapping, load any audio track on the Serato deck, with some cue points stored.
1. Select the cue point you want to map in Ableton, for example: Hardware Cue Point 1 (red) to be mapped with Software Cue Point 1 (red).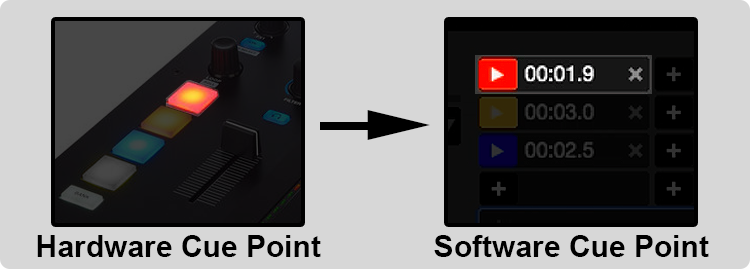 2. In Ableton, arm the MIDI track “SERATO” and click in the empty slot, to start the recording of the clip
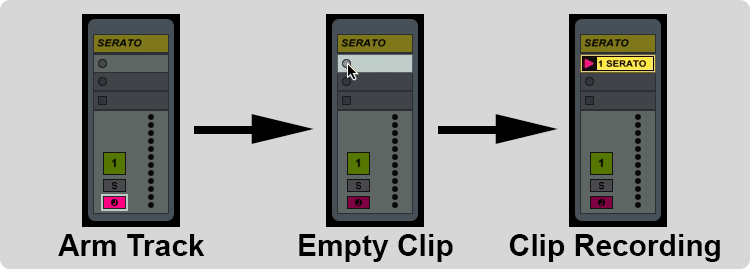 3. As soon as it starts recording, press the physical button of the Hardware Cue Point, to record MIDI data into Ableton clip
4. Press the clip again, in order to switch from recording to playback, is extremely important keep the clip in playback and loop, before moving into the Serato window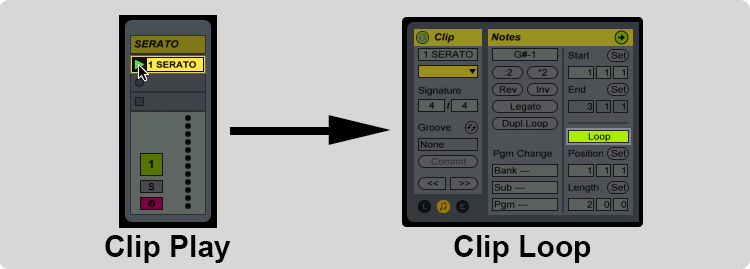 5. Open the MIDI mapping on DJ Serato (next to Setup button)
 6. Click the Software Cue Point, which will receive the MIDI message from Ableton clip and voilà the cue point is mapped!
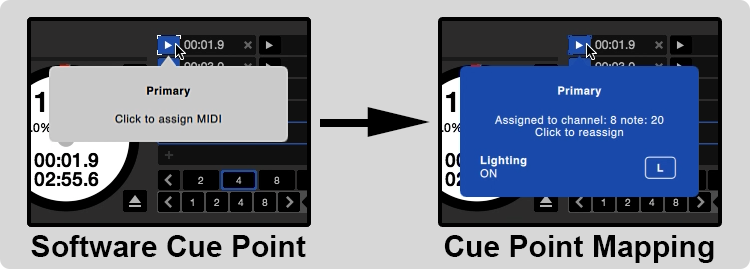 7. Close the Serato MIDI mapping and repeat the whole operation for the other cue points on your mixer
In the video was used the following equipment
Mixer: Mixars Duo
DVS Software: Serato DJ 1.9.4
Sequencer: Ableton Live 9.7
Ableton controller: Ableton Push 2
Turntables: Technics 1210 MkII & Vestax Pdx 3000
Computer: Apple MacBook Air 11″ Intel Core i5
Operating system: OS X Yosemite 10.10.5
Final recommendations
In Ableton there is the possibility to use the outputs of some mixers, controllers and devices with an internal sound card, like the Mixars Duo. However, this audio routing associated with the use of IAC Driver, can overload the USB bus data flow and cause usb dropouts with audio glitches in Serato.
The options for the audio output of Ableton in case of usb dropouts, is to use the mini-jack audio output of the Mac / Pc and connect it to Aux In of the your mixer, or use a FireWire or Thunderbolt audio interface, in order to give more bandwidth for the USB data stream of Serato.
When a computer is not powerful enough, in order to reduce the CPU usage, it is recommended to disable the Expansion Packs of Serato DJ when not in use: Serato Video, Sampler, Flip, Pitch ‘n Time DJ, FX, etc.
F.A.Q.
• My operating system is Windows, how can I activate the IAC Driver?
The equivalent of IAC Driver in Windows, is called MIDI-OX and is free download.
• What is the difference between Serato Flip and Cue Point Sequencing?
Serato Flip is similar to an audio loop, it can not be changed after recording. Cue Point Sequencing is MIDI, more flexible and changeable with a step sequencer.
Newsletter
Descrizione della video performance
Per far capire al meglio la demo di Controltablism con Ableton Live, la performance nel video è semplificata al massimo, come la scelta di utilizzare il famoso brano “I Want You Back” dei Jackson 5.
Il video si focalizza su 4 step fondamentali:
1. Ableton Cue Point Mapping: sistema per registrare i messaggi MIDI dei cue points, da Serato in Ableton direttamente dal proprio mixer, lettore o controller
2. Cue Point Sequencing: sequenza di cue point registrati in un sequencer, in questo caso registrati tramite l’Ableton Cue Point Mapping
3. Controllerism: lancio e registrazione delle clip nella Session View di Ableton e accordi di synth con il Note Mode del Push
4. Turntablism: scratching sul Cue Point Sequencing della chitarra nel Deck 2 e un assolo di sax nel Deck 1
 I cue points all’inizio del brano “I Want You Back” usati nel Cue Point Sequencing del video
Sincronizzare Serato DJ con Ableton Live
La velocità originale di “I Want You Back” è di 98 Bpm, con il pitch del giradischi è velocizzato ai 104 Bpm della sessione di Ableton. Tuttavia è possibile sincronizzare i Bpm di Ableton e Serato tramite la tecnologia Ableton Link. L’intonazione originale del brano è preservata con la funzione Key Lock di Serato, oppure Pitch ‘n Time DJ.
Ableton Cue Point Mapping Tutorial
Innanzitutto è importante capire che lo stesso cue point è suddiviso in 2 parti:
• Hardware Cue Point > bottone fisico sul pannello del mixer
• Software Cue Point > bottone virtuale nella finestra del software
Dall’Hardware Cue Point al Software Cue Point, vengono inviati 2 segnali in parallelo: sia il mapping di fabbrica e sia l’Ableton Cue Point Mapping. Useremo il Driver IAC per emulare una macchina virtuale e far credere a Serato, che il nostro segnale MIDI proviene da un dispositivo esterno.
Requisiti
• Mixer, player o controller compatibile con il MIDI, dotato di bottoni cue point
• Software Serato DJ
• Software Ableton Live
Il Push 2 o altri controllers non sono fondamentali nella operazione di mapping, ma durante la performance dal vivo.
Settaggi
Applicazioni > Utility > Configurazione MIDI Audio
Menù > Finestra > Studio MIDI > Driver IAC
Spuntare casella: Il dispositivo è acceso
 Attivare IAC Driver in Serato DJ:
Setup > MIDI > MIDI Devices
Selezionare: Driver IAC Bus 1
Spuntare casella: Enable MIDI Device

Preferenze > MIDI
Input: Ableton Push 2 > Traccia > Sì
Input: Mixars DUO > Traccia > Sì
Output: Drive IAC (Bus 1) > Traccia > Sì
 Settaggi nella Session View di Ableton Live:
1. Creare una traccia MIDI e nominarla “SERATO”
2. MIDI From: selezionare Mixars DUO
3. All Channels
3. Monitor: Off
4. MIDI To: Driver IAC (Bus 1)
5. Ch. 8 (selezionare un canale MIDI libero)

A seconda delle esigenze, creare una o più tracce MIDI con gli stessi settaggi, per controllare più Serato decks in maniera indipendente.
Operazione di mapping
Prima di partire con il mapping, caricare una qualsiasi traccia audio sul deck del Serato, con dei cue point memorizzati.
1. Scegliere il cue point da mappare in Ableton, ad esempio: Hardware Cue Point 1 (rosso) da mappare con Software Cue Point 1 (rosso). 2. In Ableton, armare la traccia MIDI “SERATO” e cliccare nello slot vuoto, per avviare la registrazione di una clip
 3. Appena inizia la registrazione, premere più volte il bottone fisico dell’Hardware Cue Point, per registrare i dati MIDI nella clip di Ableton
 4. Premere nuovamente sulla clip, per passare dalla registrazione alla riproduzione, è fondamentale lasciare la clip in riproduzione e loop prima di spostarsi nella finestra di Serato
 5. Aprire il MIDI mapping di Serato (accanto al tasto Setup)
 6. Cliccare sul Software Cue Point, che riceverà il messaggio MIDI dalla clip di Ableton e voilà il cue point è mappato!
 7. Richiudere il MIDI mapping di Serato e ripetere l’intera l’operazione per gli altri cue point del vostro mixer
Nel video è stata utilizzata la seguente attrezzatura
Mixer: Mixars Duo
DVS Software: Serato DJ 1.9.4
Sequencer: Ableton Live 9.7
Ableton controller: Ableton Push 2
Giradischi: Technics 1210 MkII & Vestax Pdx 3000
Computer: Apple MacBook Air 11″ Intel Core i5
Sistema operativo: OS X Yosemite 10.10.5
Suggerimenti Finali
In Ableton vi è la possibilità di utilizzare le uscite di alcuni mixer, controller e dispositivi con una scheda audio interna, come il Mixars Duo. Però questo routing audio associato all’uso di IAC Driver, può sovraccaricare il flusso dati del bus USB e causare usb dropouts con glitch audio in Serato.
Le alternative per l’audio output di Ableton nel caso di usb dropouts, è usare l’uscita mini jack del Mac / Pc e collegarla all’Aux In del mixer, oppure usare una scheda audio FireWire o Thunderbolt, per lasciare più banda al flusso dati USB di Serato.
Se non dispone di un computer abbastanza potente, per ridurre il carico sulla cpu, si consiglia di disabilitare gli Exapansion Pack di Serato DJ, se non vengono utilizzati: Serato Video, Sampler, Flip, Pitch ‘n Time DJ, FX, ecc.
F.A.Q.
• Il mio sistema operativo è Windows, come faccio ad attivare lo IAC Driver?
L’equivalente di IAC Driver, in Windows si chiama MIDI-OX ed è in free download.
• Che differenza c’è tra Serato Flip ed il Cue Point Sequencing?
Serato Flip è simile ad un loop audio, non è modificabile dopo la registrazione. Il Cue Point Sequencing è MIDI, più flessiblie e modificabile tramite uno step sequencer.